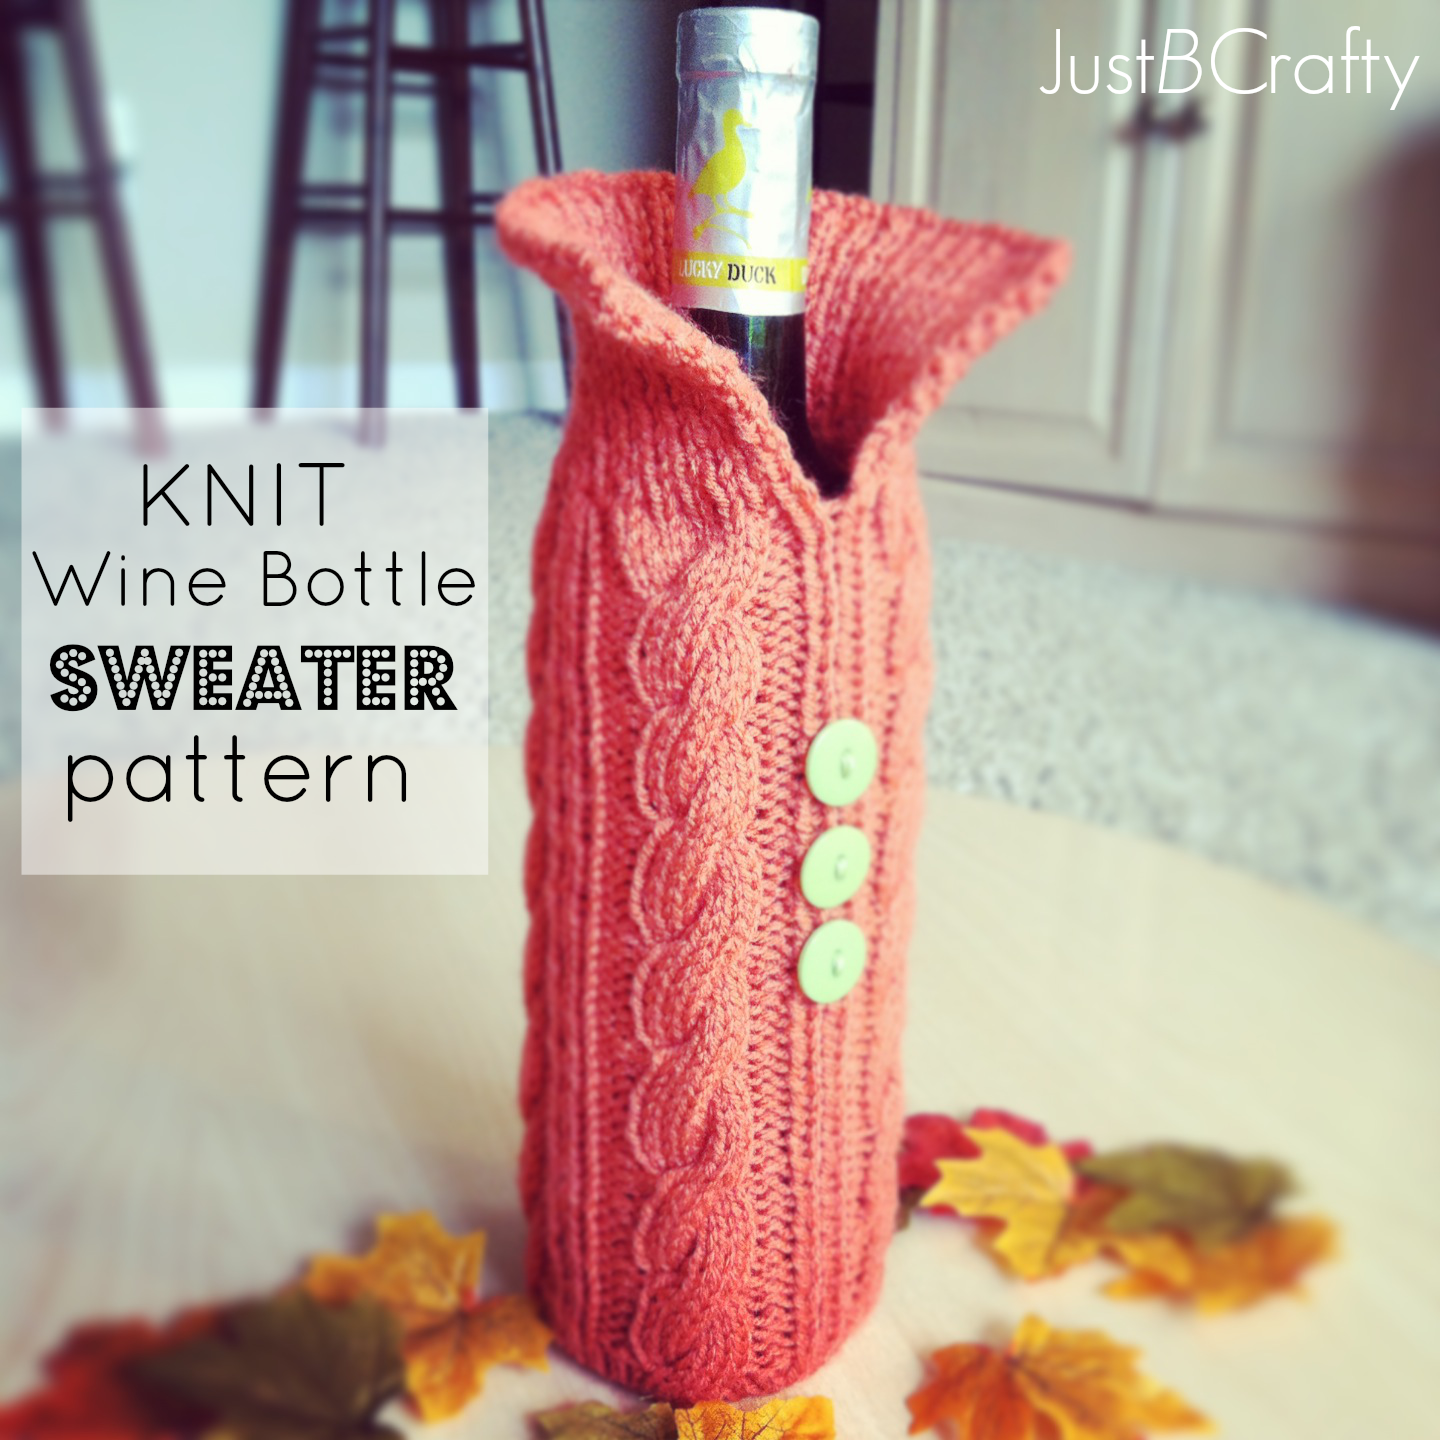
This Wine Bottle Sweater will make for the PERFECT handmade hostess gift for your next holiday party! Keep reading below for the free pattern!
Update: The formatting of this post has been updated to make it easier to read!
October flew by so fast, I can’t believe its the beginning of November already. Things have been a little quiet around here this past week as I was sick with stuffy nose and sore throat but am luckily feeling better now.
We had a nice night in for Halloween that consisted of cold medicine, tissues, popcorn, candy and of course scary movies. We watched The Conjuring and it was so good! If you are looking for something really really scary, check this film out. It will definitely not disappoint.
Fun fact, some scenes in the movie were filmed in Wilmington at the local university where I worked and took some classes. One of the scenes were even filmed in the building I worked in while I was working!
I knew camera crews were set up in the auditorium of my building and just thought they were shooting a commercial, but now I know Vera Farmiga and Patrick Wilson were just mere feet away from me filming a major motion picture! I totally wish I would have just snuck a little peak and maybe asked for an autograph, but that’s ok you live and learn.
Now that Halloween has past and Thanksgiving on its way, I wanted to make a craft that would be practical for the upcoming holidays. The pattern was inspired by this cute idea on Pinterest. I thought a little sweater would be a great way to dress up wine bottles to give as hostess gifts for Thanksgiving and Christmas parties. It’s a pretty quick project and can be easily knit over the course of a couple evenings.
Wine Bottle Sweater Pattern
This post contains affiliate links. For more information please see my disclosures page.
A printable PDF version of this pattern can be purchased here.
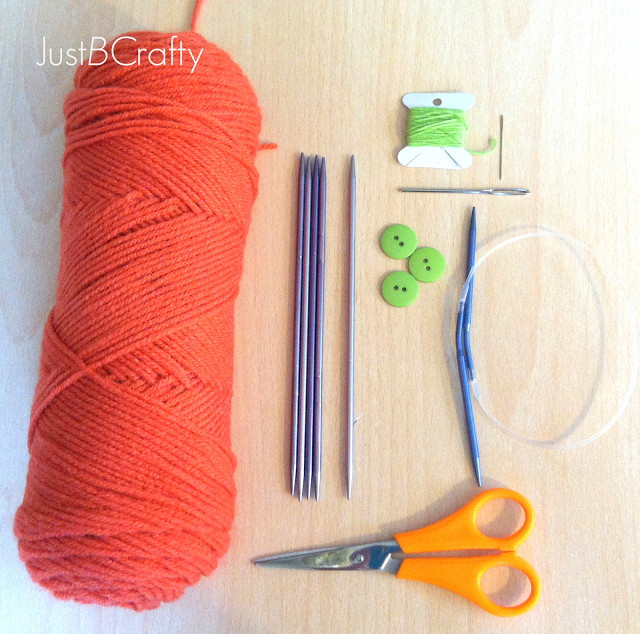
Materials
- Red Heart Super Saver Yarn in Coral (or any worsted weight acrylic yarn will do)
- 5 Double Pointed Needles, US size 5 (will need to purchase 2 packs of 4)
- stitch holder ( I just used a circular needle or extra dpn)
- yarn needle
- thread needle
- embroidery floss
- buttons
Key
- co – cast on
- k – knit
- p – purl
- kfb – knit in the front and back loops
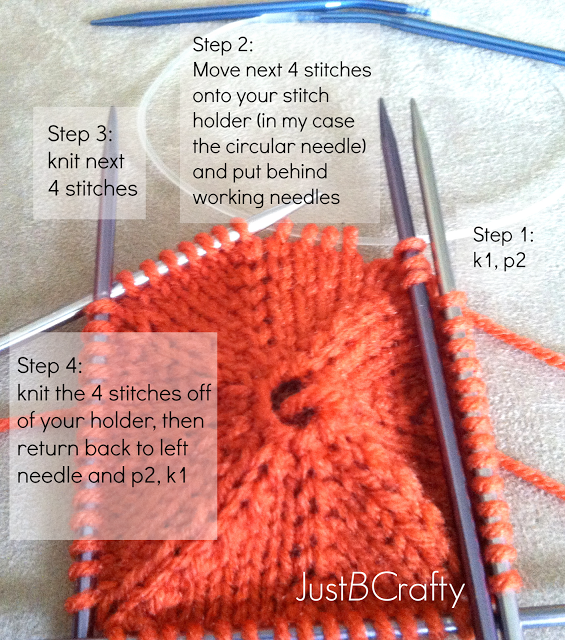
- C8R – 8 stitch right cable
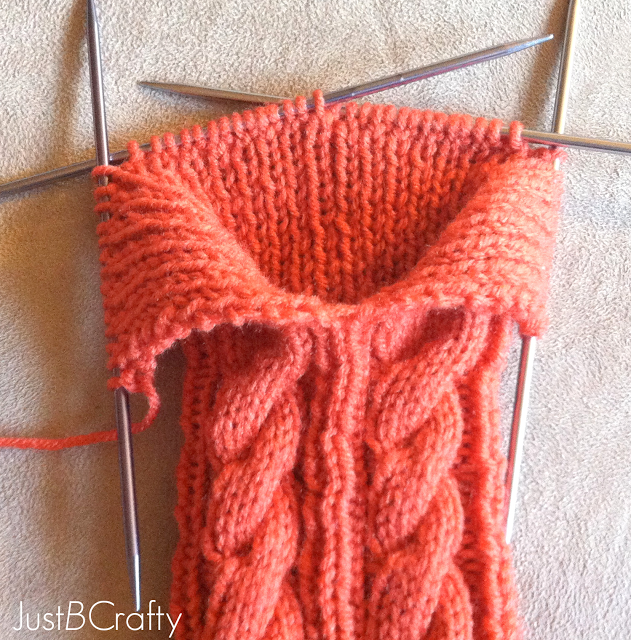
PATTERN NOTE: “C8R” means 8 stitch cable to the right. To do this, move 4 stitches onto your stitch holder and put behind your working needles, knit 4 and then knit the 4 stitches off of the stitch holder. And there you have your C8R, easy!
Here is a photo of the process:
PATTERN STARTS HERE
[Bottom]
Co 8 st on 4 dpn with 2 stitches per needle (making sure you have not twisted your stitches)
Round 1: kfb in every stitch (16)

Round 2: knit in every stitch
Round 3: *kfb, k1; repeat from * to end of round (24)
Round 4: knit in every stitch
Round 5: *kfb, k2; repeat from * to end of round (32)
Round 6: knit in every stitch
Round 7: *kfb, k3; repeat from * to end of round (40)
Round 8: knit in every stitch
Round 9: *kfb, k4; repeat from * to end of round (48)
Round 10: knit in every stitch
Round 11: *kfb, k5; repeat from * to end of round (56)
Round 12: knit in every stitch
[Body]
Round 13: *k1, p2, C8R, p2, k1, repeat from *3 more times
Round 14: *k1, p2, k8, p2, k1, repeat from * 3 more times
Round 15-19: repeat Round 14
Repeat Rounds 13-19 until entire piece measures 9 ½ inches or desired length for your wine bottle
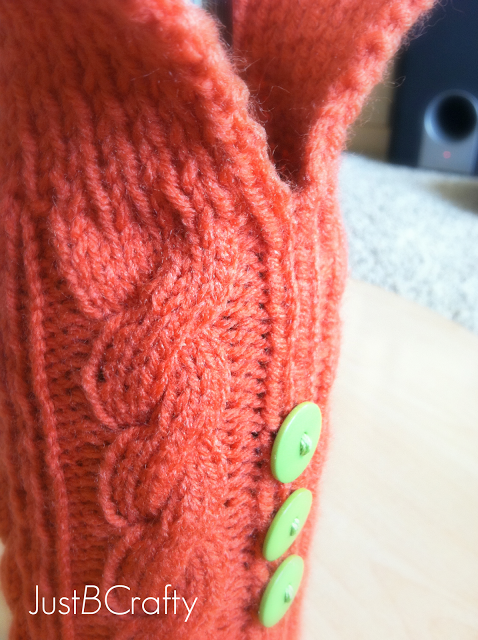
[Collar]
For the collar, work back and forth in rows by knitting all the way across the row and turning the work once you get to the last stitch. Then, knit your way back.
Row 1: turn work and k1, p1 to end of row, turn work
Row 2: k1, p1
Keep repeating k1, p1 until ribbed collar measures 2 ½ inches
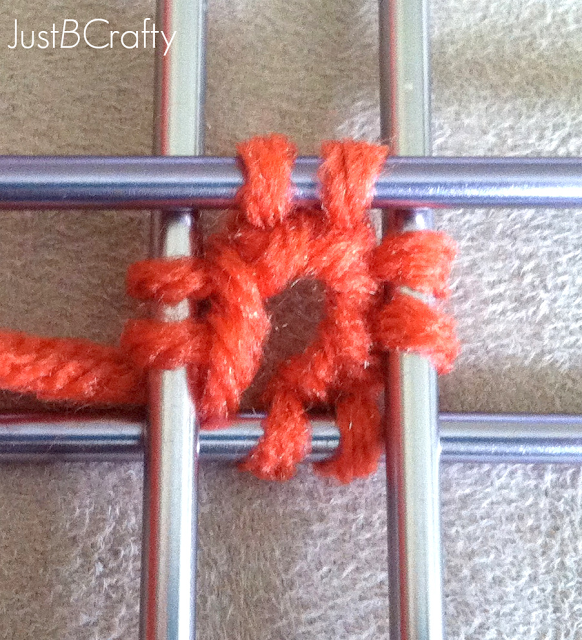
Your collar should look like the photo below:
Bind off and weave in loose ends. For a little added character sew on a few buttons with a coordinating embroidery floss.

Enjoy!


what size needles did you use?
US size 5 double pointed needles, thanks for catching that! I am adding that in the post right now!
oh I'm casting on right this very moment! It's adorable!! I'm sorry but I'm already stuck at Round 3: kfb, k1 (24)… I have 12 sts on the dpns, I understood I have to kfb every stitch that gives me 24 but where do I do K1?
Thanks a heap.
pat
Hi Pat, I'm so happy you are making a sweater!! To answer your question..when you cast on there should be 8 stitches (2 stitches on each of the four needles). In round 1, you will kfb (increase) in every stitch, giving you 16 stitches (4 stitches per needle). Round 2, is just knit to the end of the round.
So, in round 3 you kfb, k1, and repeat (kfb, k1) until the end of the round giving you 24 stitches. Hope that helps, if you need any more assistance let me know, I'm happy to help!! 🙂
So I am not a knitter, but this adorable wine bottom sweater, makes me want to learn! I used to crochet so I may need to break out the needles and finally learn to knit. I just love this…so adorable. I think the popped collar does it for me 🙂 I would LOVE it if you'd like up your wine bottle sweater at Two It Yourself's Link It or Lump It Link party this week! http://www.twoityourself.blogspot.com/2013/11/features-and-link-it-or-lump-it-link.html#more
Thank you! And I am headed over to your blog to link up my pattern. I am excited to check out all the other projects as well! Thanks for the invite! 🙂
Thanks @Brittany for linking up! I just featured your adorable wine bottle sweater on 2IY's facebook page. https://www.facebook.com/pages/Two-It-Yourself-DIY/379219858853082
Awesome, thanks! I'll check it out!
Super cute! I wish I had more time to knit and knew someone to make this for! I'll have to keep it in mind for later on when I do (hopefully) have some time. Visiting from the Dream to Reality hop!
Hi Natasha, thanks for stopping by! 🙂
OMG, sooo far beyond my capabilities! But I love your bottle sweater, it's so cute:@)
Hahah, thanks Lynn! It really is a lot easier than it looks! 🙂
Thanks for the pattern – I might consider this for some of my wine-drinking friends for Christmas this year.
Awesome! I'm sure they would love it!
thank you for visiting my blog!!!!!
xxx Ale
I can't knit but I wish I could. This is absolutely amazing and your photos for the tutorial are great. Thanks for linking up to Link It or Lump It this week 🙂
Thanks Alison, and thanks for hosting the link party! 🙂
Love it! Thanks for linking up on Hookin On Hump Day!
Thanks for hosting!
Thanks for this useful tutorial: I was thinking of making some before seeing this post but I've been too busy with my coasters – maybe for next year! I'm sharing this on my Facebook page.
Hi Sophie, thanks for stopping by! I love your coasters, and thanks for the Facebook share!!
Thanks for the super easy and beautiful pattern. I've modified it slightly, but it still seems to be pretty true to what you've done. I'm excited that I was able to finish most of it tonight. One of the changes I did was to start with the 8 stitches on one needle instead of 4. After a couple of tries, I figured out that I wasn't coordinated enough to start with that few of stitches on the needles. Then I did several rows on the one needle (purling the even row instead of knitting it). I think I switched to 4 needles once I hit about 32 stitches. I love that you've got it split between the 4 needles. It was nice to not have to think about where I was, except on the cable rows. The other thing I did differently is that I used size 8 needles instead of 5's. Since I'm traveling, I happened to have the one sized needles with me. It seemed silly to purchase more of what I knew I had at home. Thanks for the inspiration. These are making for great quick and easy christmas gifts!
Hi Stephanie, thank you so much for your comment! I agree the first few rounds are a little awkward and a bit difficult to keep control of the needles. I'm so happy you came up with a way that worked for you! Another method to make it a little less awkward could be to use 3 needles instead of the four for the first few rounds then add in the fourth needle a little later. I'd love to see your finished product, if you're a Ravelry user link up your photo!!
Brittany, I took some pictures of the finished project, but never seem to have the photos in the same place as I am when looking at the pattern. I did find out that I have an account with ravelry, but it was created so long ago that I don't remember doing it. As soon as I can figure it all out and have my photos in the same place, I'll link it all up. Thanks again for the inspiration. I have plans to make many more.
Brittany, I figured out how to add the project to Ravelry, but I don't know how to find you to link back to you or your pattern. Can you help? I'm listed as HanieRene there. Thanks!
Brittany, I still love this pattern! It's perfect for quick gifts this time of year! I about panicked when I thought I couldn't find the pattern again. I wondered if you might have a pdf that you wouldn't mind sending to me? I also wondered if you've ever thought of using a "selvedge" edge for the collar. I found it on another pattern… and had to watch a YouTube video to figure out what it was supposed to look like. But it does create a nice smooth edge for the collar. Just thought I'd pass that along. I hope you're doing well.. and thanks!
Hi Brittany, this is so darn cute and I would love to knit it, but I am not adept at using dpn's. Would it work using circular needles?
Hi Sanna, unfortunately no matter what, in the first few rounds you will have to use the dpns just because it would be too small for a circular needle. You could probably use a circular needle after the first 11 rows but only if it is short enough. If you use a circular needle that is too long, the sweater will be all stretched out.
My suggestion would be to try spreading the stitches over 3 dpns rather than 4. That will save some the of the awkwardness. It's always awkward for the first few rows, but after that it gets much much easier! The reason I have the stitches spread over 4 dpns is because it saves you from having to count your stitches as you will be doing the same thing on each of the four needles.
Let me know how it goes!
Sanna, not to contradict what Brittany said (since she's the pattern author…) but I think it would be possible to do this on circular needles (or straight ones for that matter.) The catch is that you wouldn't be able to work the pattern in the round, and might need to make some adjustments accordingly. For example, when I started working on it, I found that I wasn't able to work four dpns with so few stitches on the needles. So instead, I used only two needles and worked the pattern back and forth until I had enough stitches to work with the dpns. The adjustment I had to make was to purl on the even rows instead of knitting, as listed. I also had a little bit of a seam to sew together for the beginning of the pattern. If you're not comfortable using dpns, work the pattern back and forth as I mentioned. Just keep in mind that you'll have to do the opposite on the wrong side rows. You might also need to adjust which rows you're cabling on, so that you're not trying to cable on the wrong side. When you get to the end, be sure to stop your seam before the collar! Personally, I think you should try the pattern on the dpns. It takes a little practice to get the hang of it. But in the end, it's a great feeling to "beat a challenge" and pick up a new skill in the process! Good luck!
Not to dispute Brittany at *all* (and with many thanks for this excellent pattern) but if you wanted to, you could try the magic loop technique. I learned it on YouTube (where I’ve learned almost everything I know about knitting). I enjoy watching VeryPinkKnits videos but there are so many available. I have zero luck with DPNs but I can do the magic loop with 4: circulars and a 24″ cable. HTH
Love this pattern, I am not an experienced knitter, but I just have to have to knit asap.
Do u have a video of it?
It will be easier to follow.
Thanks
So cute!! I’m super excited to make this for gifts to give to my wine friends (one for me too)! I think it will be the perfect project for magic loop.
Reply to stuck on round 3. I worked with that a while and finally went back to the pattern on the internet and realized that the way my pattern printed out, round 1 was on another page and I was skipping it, just thinking round 1 was the cast on. When I realized that, it was easy from there on out. DUH
I love your pattern! I’m making 6, one for each of my husband’s siblings, for Christmas. If I wanted to skip the cabling in a couple to mix things up, would you suggest having less stitches for the body? Not sure if the cables make the pattern tighter or if I used the same amount of stitches (56) if it might be too loose.
Thanks for any feedback!
Hi Melissa!! I am so glad you are enjoying the pattern! It may be a bit of trial and error. I haven’t tried the pattern without the cabling. The cabling does make it tighter, but it would probably work with the same stitch count and no cables because it does fit pretty snug as written. Let me know how it goes! 🙂
i liked the design i want the vedio to follow.
which website sholuld i go to see the vedio
hi britanyi liked the design ,as this is my first time to knit the vwine cover.so pls if you can tel me the vedio so i can follow the vedio and make.
which website sholuld i go to see the vedio
thankyou so much.
Hi Smita! Thank you for your comment. I unfortunately do not have a video tutorial for this yet, but I will definitely put this on my to-do list!
hi britany,
i liked your pattern so much the sweater of wine cover bottle.
i would appreciate if you send me the vedio as everytime i m making a mistake.
will wait for your reply as soon as possible
thankyou so much
loves
smita
Hi Smita! I unfortunately do not have a video of this pattern yet. Let me know if you have any questions about the pattern though!
how do i start i have taken 4 needles then each needle put two stitches and thn i cant follow until i see the vedio and i want to make this design i like it very much.
pls if you can help
thankyou
Hi Brittany. Just finished this to house a very special bottle of wine for a 50th birthday. Thank you so much. Perfect pattern. Great pics to help get started. Hayley
hi britany,
i liked your pattern so much the sweater of wine cover bottle.
i would appreciate if you send me the vedio as everytime i m making a mistake.
will wait for your reply as soon as possible as i have not received any vedios
thankyou so much
loves
smita